Showing posts with label vegan. Show all posts

Thursday, March 20, 2014

Quick and Easy Vegan Fried Rice

Wow!  It is already March and I'm finally settling down to blog.  With 2 of my girls in a charter school this year that mostly has at-home-work, my days have been more filled than in the past.  That being said, I've been meaning to post one of my favorite easy and tasty meals that has become one of my favorite lunch (and/also supper) dishes to make.  I like fried rice and chow mein, but they aren't usually the healthiest coming from a restaurant, so I decided to make my own at-home version of vegan fried rice. My instructions are approximate because this dish can be made with various ingredients and amounts of ingredients.  You can tinker with it and modify it as needed.  This is a great way to use your left-over rice.


Vegan Fried Rice
 
 
Ingredients:


2-3 cups of already cooked brown rice (or white rice)
Olive Oil
Garlic powder
Dried chopped onions (I use Kirkland brand)
Dried Thai chili or chili flakes of choice
Soy Sauce
Salt (if desired)
1 - 1 1/2 c. of chopped green cabbage
1 - 1 1/2 c. of chopped broccoli

Heat 2-3 tablespoons of olive oil on medium heat in a large non-stick saute pan.  Saute the broccoli for 4-5  minutes.  Then, add the chopped cabbage, 1-2 teaspoons of garlic powder, 1 tablespoon of chopped onions, a small sprinkle of salt, and the desired amount of dried chili.  Saute this for a few more minutes until the cabbage starts to become opaque.  Put the rice and about 1/4 cup of soy sauce in the pan.  Saute and stir every couple of minutes until the ingredients are thoroughly mixed, but not overcooking the vegetables.   Serve and enjoy!  I like it best with some Sriracha as garnish. 

Saturday, November 23, 2013

Vegan Mushroom Wild Rice Soup

Not sure what to do with that leftover wild rice mix from dinner  couple of nights ago?  Here is  a super, easy soup that I whipped up for myself a few days ago when it was chilly out and I felt like a nice, hot bowl of soup for lunch.  I made it by just throwing ingredients together and not measuring, so you have to trust your instinct when replicating this recipe. 

First, I sautéed sliced baby Bella (crimini) mushrooms and chopped onions in olive oil in the bottom of the stock pot with garlic powder and dried minced onion pieces for just a few minutes until the mixture was starting to brown.  Then, I added about 4 cups of water and a generous sprinkling of seasoned salt to the stock pot, brought it up to a boil, and simmered this for 15 minutes. 

Next, add your already cooked brown rice/wild rice mix.  Then, you add in the type of "milk" that you prefer.  I used soy, but rice milk or almond milk would work just fine, too, but probably  not any vanilla flavored variety.  Bring this to a boil again and turn in on low to simmer.  Mix up flour and water until it is a smooth, thick paste and add it to the soup little by little while stirring the whole time.  Let it simmer for about 5 more minutes to see if it is the thickness that you want.  Adjust the broth by adding more of the flour mixture, as desired (or adding in more milk if you have overdone the thickening). 

Serve and enjoy! 

Friday, November 22, 2013

A Coconut-Lime Peanut Curry with a Vegan Make-over

I was searching for a curry recipe a few days ago to try out that used coconut milk and peanut butter and I found this really great recipe at Family Fresh Cooking.  It isn't vegan, though, so I made a few substitutions. 

  • Fish Sauce:  I have a vegan fish sauce that my hubby found for me at a local Asian market, which is definitely the way to buy any Asian food supplies you may need.  Just be sure to look out for MSG on your labels before buying.  If you don't have vegan fish sauce, I recommend just using soy sauce or tamari (even better for this substitution) in its place.
  • Sesame Oil:  An ingredient that I have on hand sometimes, but not always.  In this recipe, I just omitted this ingredient because it really wasn't necessary to add extra oil. 
  • Chicken:  I cubed up a Costco size package of firm tofu into very small cubes and sautéed that up in coconut oil until it was turning golden brown before adding the sauce.
  • Asparagus:  I didn't have any asparagus, but wanted to add a few veggies to this dish, too.  So when the sauce and tofu were simmering, right at the end I added baby Bella mushrooms and chopped up bok choy.  I also thought that either broccoli or fresh green beans would be tasty in this dish, too.
  • Thinning out the sauce:  I felt that this sauce was pretty thick and wouldn't go very far, either, to feed the whole family, so I thinned it out with some rice milk which worked wonderfully.  You could also use vegetable stock to do the same thing and just thin the sauce to your desired consistency. 
This made for a very tasty supper served with hot brown rice and I will definitely make it again!

Monday, September 23, 2013

Vegan Zucchini Muffins


This is the time of the year for squash, zucchini, and pumpkins.  I love zucchini muffins, so I adapted my favorite banana muffin recipe for zucchini and they turned out great! 

Karlie's Vegan Zucchini Muffins
 
1 medim-size zucchini, skin on, grated
 
1/2 c. applesauce

1 tsp. pumpkin pie spice mix
 
1 c. unbleached, all-purpose flour
 
1 c.  white, whole wheat flour (I get mine at Trader Joe's)
 
1/2 c. granulated sugar
 
1/8 c. of very warm water whisked together with 1 rounded Tablespoon of Ener-G egg replacer; whisk until it is fluffy and thick
 
 
Mix the above ingredients together either by hand or on low on the Kitchen Aid.
 
Sprinkle 1 tsp. baking soda over the batter.
 
Pour 4 Tbsp. of warm water over the baking soda and let it mostly dissolve. 
 
Mix the batter together gently one more time.  Mix in walnuts or pecans at the very end, if desired.
 
Bake at 375 F for 20 minutes, or until a inserted toothpick comes out clean. 
 
Let cool for a few minutes and then enjoy!

Sunday, September 1, 2013

Vegan Latkes

I had never made latkes before, although I had thought about it many times in the past, but just never gotten around to doing it.  Then, my oldest, Isabella, was looking through a potato cookbook from the UN that my mom bought us as a gift and she determined to make latkes for the family for dinner.  I found a vegan latke recipe on Alicia Silverstone's blog, The Kind Life .   She found the recipe on another blog called, Girlie Girl Army.  Here is the link to their recipe for delicious vegan latkes.
I wish I had taken a picture of this meal, but it was eaten up so quickly that we didn't have time to take a picture.  All of Isabella's younger sisters were either requesting that she make another batch immediately (even though we had almost doubled the original recipe) or make them for their special birthday meal. 

We didn't have parsley like the original recipe called for, so we used fresh thyme out of our garden and that was a great substitute.  Also, I not only used a colander for squeezing out the grated potatoes, but I also put them in a tea towel and really squeezed out the excess liquid which worked really well.  The latkes have such a wonderful flavor with the onion and herbs that hey don't really need a topping, but we had applesauce, chipotle Vegenaise spread, and sauerkraut out for anyone that wanted to mix it up a bit.  We were also thinking that a plain, non-dairy yogurt would be a good alternative to sour cream as a topping, too. 

Wednesday, August 28, 2013

Vegan Peanut Butter Cookies


Baking with just plant-based foods can be tricky at times and has required quite a bit of experimentation on my part.  Sometimes, a recipe turns out really well, though, and is worth sharing.  Livia, our 5-year-old, wanted to make some cookies yesterday afternoon, so I decided to modify a "Crisco" peanut butter cookie recipe ( I like Crisco for the occasional piecrust, because it turns out so flaky, but otherwise, it isn't a fat I would recommend for baking). 

Karlie's Vegan Peanut Butter Cookies

3/4 c. creamy, all-natural peanut butter
1/4 c. coconut oil
1/4 c. applesauce
1 c. loosely packed brown sugar
1/4 c. white, granulated sugar
2 Tbsp. soymilk (or other dairy-free milk)
1 Tbsp. vanilla extract
1/8 c. of very warm water + 1 Tbsp. Ener-G egg replacer (beat together until it is the consistency of very stiff egg whites)
1 c. white, all-purpose flour
3/4 c. whole wheat flour
1 tsp. baking soda
1/2 tsp. salt (or less, if desired)

Heat oven to 375 degrees.  Combine peanut butter, coconut oil, applesauce, brown and white sugars, soymilk, vanilla, and egg replacer mixture in a large bowl.  Whisk together until thoroughly combined.  Combine flours, baking soda, and salt.  Add all at once to the wet mixture and stir together with a spoon until the dry ingredients are fully incorporated.  Drop by rounded tablespoonfuls onto a greased cookie sheet (or put parchment paper on the cookie sheet and give it a light spray with canola oil cooking spray).  Flatten slightly in a crisscross pattern with tines of a fork.  Bake one cookie sheet at a time for 8-9 minutes, or until set and just beginning to brown.  Cool 2 minutes on baking sheet.  Remove cookies to cooking racks to cool completely.

Makes 2-3 dozen cookies (depending on the size of cookie).

Note:  Vegan chocolate chips mixed in at the end before baking would be wonderful in this recipe.  (I didn't have any on hand, or I would have put them in this time around.) 

This was super easy to make, bake, and the whole family loved them.  We'll definitely be making these cookies again!

Saturday, August 24, 2013

Mac N' No Cheese


Our girls are enthusiastic eaters and on most days, they are also happy to be eating a plant-based diet.  But, there are a few menu items from our former ways of eating that they still miss and request at times.  So, I decided to make them a "no-cheese" version of mac n'cheese.  Here is the basic recipe.

For a big batch for our family  I used:

24 oz. (1 1/2 pounds) of dry pasta (I didn't have macaroni on hand, so I used another shape)
2-3 Tbsp. of olive oil
1/2 - 1 cup of soymilk
7 oz. of  "Follow Your Heart" cheddar style vegan cheese, cubed
1 tsp. Lawry's seasoned salt
Any additional salt and pepper to taste
____________________________________________________
Optional:  Panko bread crumbs, garlic powder, spray canola oil
_____________________________________________________

Boil the noodles according the package directions and drain.  Put them back in the cooking pot and in the olive oil, cubes of vegan cheese, and 1/2 cup of soymilk.  Heat this on low to medium heat so that the cheese begins to melt, all the while stirring frequently to coat the noodles.  Add in the seasoned salt and if the noodles seem to be drying out, add more soymilk as needed to keep the consistency creamy.  Once the vegan cheese is fully melted and incorporated and the sauce is the desired consistency, test it and add and more salt and pepper, as needed.  You can either serve it this way, or if you want it a little fancier, put the mac n' no-cheese into an oven safe dish, sprinkle it with Panko bread crumbs, sprinkle it with garlic powder, and spray the top with a light coat of canola oil spray.  Put the dish, uncovered, in the oven at 375 degrees F, for 10-15 minutes or until the bread crumbs just start to turn a golden brown cover.  Then, enjoy!

Wednesday, August 21, 2013

A Cheer for Plant-Based Eating

My 3-year-old really likes to watch "Go, Diego, Go" and sing songs from Dora and Diego around the house.  So, the other night after a yellow coconut curry dinner that everyone was wild about, my 10 and 7-year-old decided to remake the Diego song for me into a plant-based eating cheer/song. 


Friday, August 16, 2013

Sprouted Bean Bulgur Burgers

I do a lot of cooking at home by experimentation and using ingredients or leftovers I have on hand.  We have a bag of sprouted beans in our pantry that come from Costco.  These beans are really handy because they cook up in 20 minutes and can be added to a variety of dishes.  My kids don't really love the sprouted beans just on their own, so I have started to incorporate them into other dishes.  They work really well in vegan chili and as a supplement to an Indian style curry with vegetables.  Recently, I thought they might make a good base for a vegan burger and the burgers turned out quite well. 
 
 
Here is the general recipe that I used for making the burgers, but it can be modified using whatever you have on hand.  First, I boiled about 1 1/2 cups of the sprouted bean mix with about 1/2 cup of bulgur.  This would work with another grain, too, if it needs to be cooked for approximately the amount of time that you are boiling the beans.  I boiled the bean/bulgur mixture together for approximately 30-35 minutes until the water was absorbed in the mixture and it was starting to get a little mushy.  I took the mixture off the stove to cool and added garlic powder, dried onion flakes, and seasoned salt and mixed it well (For just adults, I would add additional spices and or/chili; chipotles in adobo sauce would go really well in the mixture, too.).  Then, I finely chopped half an onion and half a red bell pepper (some corn kernels would taste good in this mixture, too) and added it to the beans.  I dumped in a lot of panko crumbs to the mixture, about 1 cup, and then added water to all of this for moisture and mixed it all together (veggie broth would taste good, too.).  The original batch was a little dry, so when I finished up with the leftover mixture, I added more water before forming the patties.  It shouldn't be so dry that it is crumbling apart and it shouldn't be a mushy mess, either.  It needs enough liquid to stick together and to form patties.  This batch made 12 burger patties.  When I am ready to cook them, I get out a non-stick pan or griddle and spray it lightly with canola or olive oil cooking spray.  Then, I fry them up nicely on each side until both sides are golden brown.  Fix them up just like you would a burger on a bun or bread with all the fixings. 
 
My daughters really like this burger and our middle child that always speaks her mind said, "This is the best vegan burger I've ever had!"

Monday, August 12, 2013

Mini Pizzas on the Go

We have pizza night at our house on a regular basis.  Eating a plant-based diet has not changed our pizza tradition, either.  We use our homemade 1/2 whole wheat dough, pizza sauce, and pile on the veggies for a full and satisfying pizza, and occasionally we will buy a vegan cheese for a little extra something on our pizza.  We like the Daiya mozzarella-style shreds, and we also tried the Follow Your Heart block of mozarella-style vegan cheese and that was pretty nice on pizza, too.  I while back, I was reading a magazine or on the internet and came across the idea to make mini pizzas in muffin tins.  I made them this way several times last spring during softball season when we needed a  meal that was portable and could be taken on the go.  Unlike a usual, messy pizza slice, these little mini pizzas are very manageable and much less messy if you need to take them in the car.  The girls also just like to eat them at home, too, because it is a variation on the usual pizza theme.

I spray my muffin tins with a spray canola oil before putting the pizza dough into the tins to avoid sticking.  Then, I grab a small ball of dough and stretch it with my fingers into a small circle.  Fit the circle into each hole of the muffin tin.


Then, spread a small amount of your desired pizza sauce (many times, this is marinara at our house) on each  circle.  Top the way that you like.


Bake at 375 degrees for approximately 10 minutes, or until the crust is baked through and the ingredients look done.
The kid's favorite, olive pizza.

The parents' version, with lots of veggies.

Yum!

Saturday, August 10, 2013

Don't Overthink the Salad

When my girls requested salad last night for supper, I told them it would have to be a really simple one and they said, "Great!". So many times, I don't make salads because I don't want to clean and chop my veggies or I don't have lettuce on hand, but I realized that it doesn't have to be a chore.  The key is just using what you have on hand and putting a simple dressing on it.


Here is last night's salad:  tomato, cucumber, kalamata olives, olive oil, balsamic vinegar, salt, and pepper.  It was delicious and super simple to make . . . and everyone ate a nice portion of raw veggies!

Friday, August 9, 2013

Back from Summer Vacation

Our first day of summer vacation started by taking our 2nd daughter, Selah, down to Children's Hospital for a week where she received antibiotics via a PICC line that aren't given orally.  This was followed up by giving the second week of antibiotics at home via the PICC line on our own after being instructed on the proper technique by an at-home-care nurse.  This, of course, was not how we planned to start the summer, but over the past year we have come to accept that there are situations that have to be accepted and walked through as part of our journey of having two daughters that have bronchiectasis (a chronic lung condition stemming from permanent lung damage).  During that time, I never once got back on the computer to blog and after that, I just disconnected from my school year routine for awhile along with the rest of the family while on summer vacation.  With a husband that is also a teacher, we really do live on the school schedule, so summer is our big time for kicking back and taking a break from the routine, doing household projects, and taking road trips.  Now, however, that is all quickly coming to an end.  School is quickly approaching and  my calendar book is filling up with appointments and events.  I will have new blog material as I start on a new adventure of sending to of our girls to a charter school where the majority of the school work is done at home, all while welcoming another litter of new little goldendoodle puppies into the household in the next couple of weeks. 

Another big part of our summer has been food preparation and eating.  No matter how the routine changes, feeding a family of 7 takes time and is always a big part of my day.  It has been a year now since we began eating a whole-foods, plant-based diet and the more we eat this way, the more excited I get about continuing to explore this way of preparing foods and enjoying the tasty results.  So, I will try and post food ideas and recipes here, too, to share our love of plant-based eating. 


Tuesday, May 7, 2013

May Photo A Day - 5/6/13

"Broken"
 
Black bean, corn, and green chili tamales.

 
Okay, so you can't exactly tell from the picture that underneath all those greens, the tamale has been "broken" open, but there it is.  I made tamales for supper last night for the first time ever and they turned out quite well, which was an accomplishment in itself.  

Wednesday, May 1, 2013

May Photo A Day - 5/1/13

"I Bought This"
 
 
For a family that loves Kalamata olives, this is a gold mine.


Baba Ghanouge and Hommos (Hummus)

More hummus
 
One of our local Mexican grocery stores that is very nearby also has a large Middle Eastern food section.  We love to make hummus platters and eat falafel, so this discovery was wonderful and also pretty surprising, considering the store is primarily a Mexican market that evens has its own tortilleria in it.  You can buy everything from a piñata for your next party to hummus imported from the Middle East at our local Valley Max.  It's so much fun finding local treasures, especially ones of the culinary kind.

Friday, January 11, 2013

A Family Favorite for Dinner

Making pizza at home has been a favorite for our family since the kids were tiny.  At first, I would pick up pizza dough from Trader Joe's in a bag and use that, but after a while, I wasn't loving the taste of the crust that much and thought I could probably do better at home.  I started using a pizza crust recipe from one of my bread machine cookbooks and the recipe is a real winner (my bread machine gets most of its use just for making dough because I prefer to bake my breads in the oven, but even so it is useful for dough making).  I modified the recipe because I like to use 1/2 whole wheat and 1/2 all-purpose unbleached flour instead of all white flour like the original calls for.  Here is the recipe:

2 lbs. of pizza dough  -  Add ingredients to the bread machine bowl in the order you see them.
Usually makes 3 medium-sized pizzas.
(This recipe can be made, also, in a Kitchen Aid mixer; after mixing and kneading for about 2 minutes with the machine, just leave it covered and in a warm place and let it rise for about an hour before using.)

1 1/2 c. warm water
2 Tbl. olive oil
2 tsp. salt
2 tsp. sugar
2 c. whole wheat flour
2 1/4 c. all-purpose unbleached flour
2 tsp. dry yeast

Over the years, our eating habits have changed.  I used to, easily, use a whole pound of mozzarella in one night of pizza making.  And, of course, we loved to put pepperoni and Italian sausage on our pizza along with lots of other toppings.  Now, we don't eat meat, dairy, or eggs.  When we decided to eat a vegan diet at home, I wondered if our pizza days were behind us and determined to keep the tradition alive even without some of the more usual pizza ingredients.  I have found the key to making a great vegan pizza is to make sure you have plenty of toppings on it.  Honestly, I don't even miss the cheese anymore and like a base of spinach or other greens on the bottom just as much.  My girls still request pizza night just as often and love it with whatever toppings we happen to have on hand that day.  Here was one of our recent pizzas.

Thursday, January 10, 2013

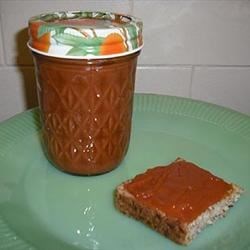
Persimmon Butter

In December, I wrote about using persimmons and my new-found like of this fruit.  On two occasions, I made batches of persimmon butter using my crockpot.  This recipe was so easy and the result is great!  I freeze what I can't use in a few weeks and then put some in the fridge for immediate consumption.  I've been enjoying it on my toast in the mornings for many weeks now.


This picture was taken from the recipe site, but mine looked just as good as this.


I did make a couple of changes.  I replaced the 1/4 c. agave nectar with 1/4 c. honey.  Also, I didn't put in individual spices; I just used pumpkin pie spice and put in the amount I liked, to taste. 

Friday, October 26, 2012

My New, Favorite, Go-To Meal

Here is a dish that I threw together with all the tastes that I like and items that I usually have on hand.  My hubby loved it so much that he wants to eat it over and over and says it could go on the menu at P.F.Chang's.  It is vegan, but it is really an Asian-inspired dish, so I think it would work for many different palates.  The other great part about this dish is that it really is just a template for the ingredients that you enjoy.  Mix and match the items I suggest and use a different sauce if that is what you have on hand.  The tofu can always be switched out for your favorite meat, too.  


First, toast 1/4 cup of raw cashews in a very lightly olive oil coated frying pan.  I use my non-stick, ceramic frying pan for this recipe.  When they are a medium brown color, transfer them to your serving dish.

Next, saute 1/4 of a chopped yellow onion in a frying pan for a couple of minutes, adding in more olive oil as needed.  Then, add 1 chopped serrano pepper (or the amount you desire) and 3 minced garlic cloves.  When this is all lightly browned, transfer to your serving dish. 

Ahead of time, press the liquid out of a rectangle of extra firm tofu; I use between 1/3 to 1/2 of the package.  Cut it up into small squares.  Then, saute it on all sides until it is golden brown.   Transfer to serving dish.

Also, ahead of time, prepare 1/2 package (or approximately 2 servings) of Asian rice noodles according to the directions and set aside.  Pour 1/4 to 1/3 cup of Trader Joe's Soyaki sauce (their Teriyaki sauce with sesame seeds, etc.) in the pan and heat it up.  Put the rice noodles in the sauce and stir frequently to heat through and spread the sauce out evenly.  When the sauce and the noodles begin to fry and/or stick to the pan, put them in the serving dish.  Mix everything together and put chopped cilantro and scallions in the dish.  Mix together one more time and voila!  Your meal is served!

Thursday, October 18, 2012

Our First Vegan Birthday Cake

Since changing the way we eat, I am re-learning how to bake using very little fats and oils while also eliminating eggs, butter, and dairy.  Tuesday was my hubby's 34th birthday and I found a recipe for chocolate cake with chocolate frosting in the McDougall's book, The Starch Solution.  The recipe looked easy enough to make and I had Augustus pick up a few ingredients that I didn't have on hand at Trader Joe's on Monday.  Also, the recipe called for a 8 X 8 pan, which I have, but doesn't look very festive.  So, instead I used a bundt pan and it came out beautifully.  The girls loved the results and were happy to see that birthday baking is still alive and well in our household.  So, yay, to our first delicious and successful vegan birthday cake!  I know there will be many more to come.

Ready to begin!

About to go in the oven.

The finished product.

Happy Birthday!

All my favorite people.

Thursday, September 20, 2012

Oil-Free, Vegan, Banana Chocolate Chip Muffins

One of our all-time, family favorites for breakfast is a banana muffin recipe that I have been using for years.  My mom made these for us as kids and we always loved them, and I continued the tradition with my children.  Lately, I've been tinkering with the recipe to make it not only vegan and fairly healthy, but to also preserve the taste we love and get the texture as close to a "regular" muffin as possible.  This morning when I made them for breakfast, we all agreed that they tasted great and were what we expect out of our banana muffin recipe.  So, I had better get this down on "paper" before I forget what exactly it was that I put in them this morning.

Vegan Banana Chocolate Chip Muffins

Preheat oven to 375 degrees F.

Mix together in a bowl by hand or on the lowest mixing setting of a stand mixer:
3 mashed, ripe bananas
1 cup unbleached all-purpose flour
1 cup whole wheat pastry flour
1/2 cup sugar
1/4 cup applesauce
1 portion of egg replacer equal to 1 egg*

After these ingredients are mixed together, sprinkle over the top of the dough:
1 tsp. baking soda
2 tsp. baking powder

Pour 1/4 cup of sparkling water over the soda and powder so that they are mostly dissolved and the mixture is bubbling a bit.  Mix it all together again, mixing as little as possible.  Add in the amount of vegan chocolate chips that you desire and mix very gently one last time (or fold them in gently with a spoon).  I use the semi-sweet chocolate chips from Trader Joe's that have no dairy in them.

Fill 12 muffin tins with the muffin batter and bake between 18-20 minutes, or until an inserted toothpick comes out clean.  (There is not oil in the recipe, but I do lightly grease my muffin tins or muffin cups before filling them.  Using either silicone muffin tins or non-stick muffin tins is also a good option.)

*A friend gave me a good tip for the egg replacer and that is to make sure the water is very hot (not boiling) before mixing in the powder.   For the Ener-G replacer the formula is 2 Tbs. of water to 1 1/2 tsp. powder. 


Thursday, September 13, 2012

Truly, Guilt-Free Tortilla Chips

A favorite snack in our house is tortilla chips with salsa and/or homemade bean dip.  The dilemma, though, is that store-bought tortilla chips are not all that nutritious (despite the whole-grain corn status that they have) because of the oil content.  While looking through the McDougall's recipes, I couldn't believe my eyes when I saw this super simple and easy solution to store-bought tortilla chips.  And, the results are wonderful, too, because they come out crispy, taste great, and make the idea of nachos at home (at least, vegan nachos) a healthy and fun dinner and snack alternative.  I also love that the tortillas chips are a whole-grain starch!  Here is the process:

Preheat the oven to 450 degrees.  We like the Guerrero brand of white corn tortillas.  I stack a few up and use my kitchen scissors to cute them into triangles (I divide the tortilla in sixths).  Then, I lay them flat on a non-stick, ungreased cookie sheet and put them into the oven.  The other day, I made these and used three cookie sheets, rotating them in the oven with 2 in and 1 ready-to-go.  

Here they are about half finished baking.
 Bake the chips for approximately 5 to 7 minutes (a few minutes more may be needed depending on your oven), just until the chips start turning a very light brown and are crispy.  Also, you can sprinkle salt on before or after, if so desired (I think the salt sticks better put on before baking).  


 And there you have it!  Tortilla chips with no oil that are still crispy and taste great with your salsas and dips.  If all the chips do not get eaten, just be sure to store them in an airtight container.    Who knew eating healthfully could be so delicious!